Webinar Host Settings
You can customize settings for individual Zoom webinars. This article demonstrates how to customize settings for a Zoom webinar both before and during a Zoom webinar. It shows how to:
- Adjust Zoom Settings before a Webinar
- Adjust Zoom Settings during a Webinar
- Adjust Panelist Settings
- Adjust Individual Attendee Settings
- Adjust All Attendee Settings
Some settings must be adjusted before a webinar begins and others can be applied while it is occurring. Please note that there are several roles in a webinar: Host, Panelists (other presenters, like Co-Hosts), and Attendees (participants). While you cannot adjust host settings during a webinar, you can adjust settings for both Panelists and Attendees. However, you must adjust settings for Panelists and Attendees separately.
Before hosting any Zoom webinar, you must download the Zoom desktop client (launcher) and log in with your SCU account. For more information about logging in, see the article: How to Set Up Zoom. For information on starting meetings and webinars, see the article How to Start a Meeting or Webinar.
Adjust Settings before a Webinar
1. Log in to scu.zoom.us.
2. Select Webinars from the menu on the far left of the window (Figure 1).
3. Click the Topic link for your scheduled webinar (Figure 1).
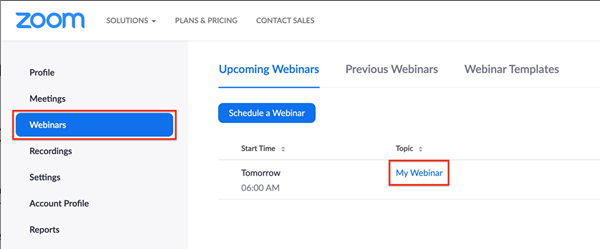
Figure 1: The Webinar settings options in Zoom.
4. Click the Edit this Webinar button near the bottom of the window to adjust the following settings (Figure 2):
- Topic
- Description
- Time/Date
- Duration
- Recurrence
- Time Zone
- Registration
- Webinar password
- Video (Hosts and Panelists)
- Audio
- Webinar Options
- Q&A
- Enable practice session
- Only authenticated users can join
- Record the webinar automatically to the cloud
- Alternative Hosts

Figure 2: The Edit this Webinar button and its additional settings.
5. The Edit this Webinar button also gives you additional settings options (Figure 2):
- Invitations
- Email Settings
- Branding
- Polls
- Q&A
- Integration
- Live Streaming
Adjust Settings during a Webinar
You must adjust your settings at scu.zoom.us before some of the features listed below appear in a live Webinar.
- Open your Zoom launcher and start your webinar. For instructions on starting your webinar, see the article How to Start a Meeting or Webinar.
- Locate the webinar host controls toolbar at the bottom of your screen (Figure 3). NOTE: Depending on your user settings, the host controls toolbar may hide when you share your screen in a meeting. Move your cursor to the top of the screen to see your host controls toolbar. The toolbar displays again at the bottom of the screen when you stop sharing your screen.
- Click the Participants button on the host controls toolbar and a Participants panel appears.
- Click Panelists on the top of the Participants panel (Figure 4).
- Hover your cursor over a panelist’s name and click the More button on the right to control these settings for that participant (Figure 4):
- Chat
- Make Host
- Make Co-Host
- Change Role to Attendee
- Rename*
- Put on Hold
- Remove
- Click Attendees on the top of the Participants panel (Figure 5).
- Hover your cursor over an participant's name and click the More button on the right to control settings for that participant (Figure 5):
- Chat
- Promote to Panelist
- Remove
- Open the Participants panel.
- Click the More button in the bottom left to control these settings for all participants (Figure 6):
- Mute participants on entry
- Allow participants to unmute themselves
- Allow participants to rename themselves
- Play Chime for Enter/Exit
- Play Chime for Chat Messages/Raise Hand
- Lock webinar
- Allow panelist to start video
- Allow attendees to:
- Raise hand
- View the participant counts
- Set video layout for attendees:
- Follow host view mode
- Active speaker view
- Gallery view
![]()
Figure 3: The webinar host controls toolbar in a Zoom webinar.
From this point you can adjust Panelist settings and Attendee settings (individually or for all).
Adjust Panelist Settings
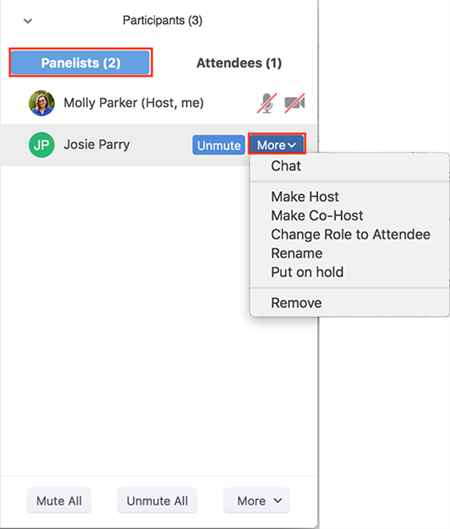
Figure 4: The Panelists panel and the More button for a Panelist.
Adjust Individual Attendee Settings
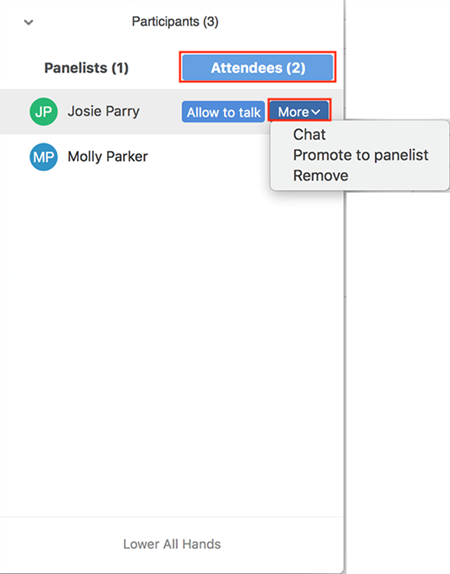
Figure 5: The Attendees panel and the More button for an attendee.
Adjust All Attendee Settings
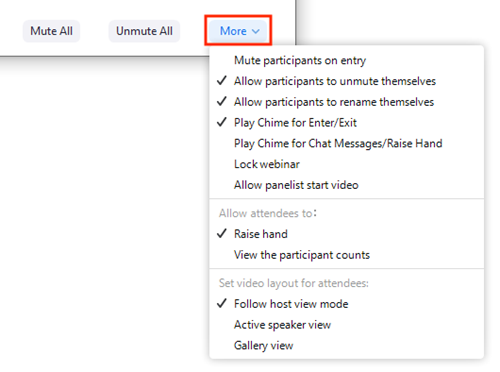
Figure 6: More button in the bottom left for all attendees.