Managing a Zoom Meeting like a Webinar
Set the Experience
Control what Participants See
Spotlight video puts up to 9 participants as the primary active speakers for all participants, and participants will only see these speakers. This feature is often used to spotlight a keynote speaker or panel discussion. It helps to make someone a co-host and have them control spotlighting.
Note: Your Zoom desktop application must be updated to version 5.3.0 to spotlight multiple participants. Learn how to update your Zoom application here.
To Spotlight a Video
- At the top of your screen, hover over the video of the participant you want to spotlight and click ...
- From the menu, choose Spotlight for Everyone.
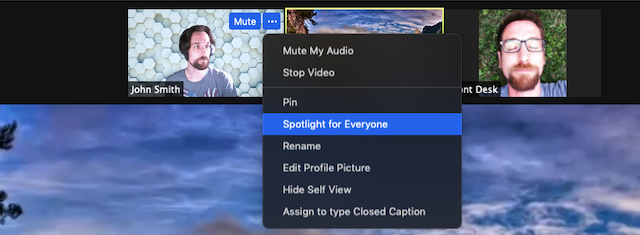
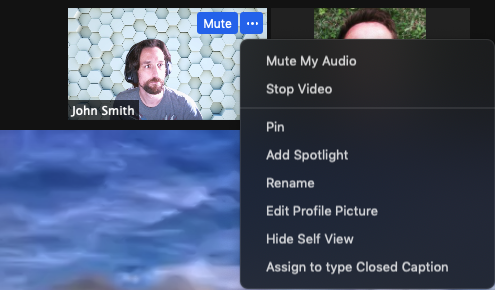
- (Optional) To spotlight additional participants (up to 9 total), follow steps 1 and 2 again as needed, clicking on Add Spotlight instead.
To Cancel a Spotlight
- Click Remove Spotlight in the upper-left corner of the video area.
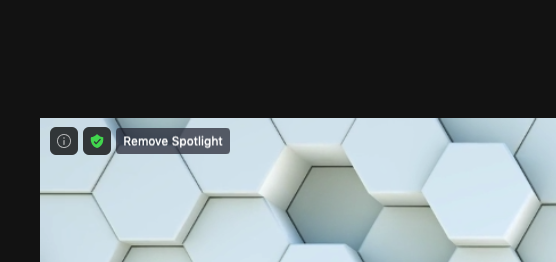
- This will return the meeting to Active Speaker.
Manage Q&A
In a webinar, the Q&A portion is private, and participant questions are only visible to the Host. Instruct attendees to ask questions in the chat, with all questions directed to the host only. Change this setting to prevent all chat messages from being public to mimic the Q&A capability. Also, for meeting security, the chat can be used inappropriately by unwanted attendees to display foul and disrespectful language that would be visible to everyone. This is more appropriate for a publicly accessible meeting, however it is always relevant.
How: Click on Chat in the Zoom toolbar, click the three dots (...) in the lower right corner of the chat window and select Host Only.
Note: Co-Hosts cannot see the chat messages, only the Host of the meeting can.
Use Live Transcription
Utilize Zoom's live transcription feature to provide basic captioning to your participants. Learn how to use this feature here. Note that these captions are not ADA compliant.
Limit Participant Interactions
In your account profile (login to scu.zoom.us) and consider changing these settings before your meeting:
- Annotation - disabling this setting prevents any participants from interacting with any data that is being shared by a Host of Co-Host. This also prevents unwanted attendees from drawing or writing inappropriate things on your data.
- File Share - disabling this setting prevents participants from posting inappropriate images into the Chat section, which can be very disruptive.
- Limit Participant Interactions - In-Meeting
During the meeting, you should change these settings to provide better control over the participants. Note that some of these can only be set during a meeting.
Mute All, uncheck Allow Participants to Unmute Themselves
When clicking Mute All, viewable when the Manage Participants button is clicked in the Zoom toolbar, you can Mute all participants that are in the session and that will join the session at some point.
How: Click Mute All, then uncheck the Allow participants to unmute themselves, click Continue
- this checkbox is important as it prevents participants from unmuting at any time.
Next Steps: the Co-Hosts can unmute themselves after this step and all Hosts can unmute any participants that they would like to permit to speak in the meeting.
Screen sharing for Host Only
This prevents participants from sharing their screen at any time during the meeting. Only Hosts and Co-Hosts can share when this is enabled. This also prevents unwanted attendees from sharing inappropriate content.
How: In the Zoom toolbar next to Share Screen, click the Up Arrow, click Advanced Options and select Host Only for screen sharing
TIP: do not enable screen sharing for participants if you have a public event. If someone needs to screen share, promote them to Co-Host so they can share, then demote them to participant when they are done. Enabling Screen Share for Participants opens the door to permit sharing, which is uncontrolled.
Set Chat to Host Only
This is a dual-purpose setting. In a webinar, the Q&A portion is private, and participant questions are only visible to the Host. See the section below on how to use chat as a Q&A. For meeting security, the chat can be used inappropriately by unwanted attendees to display foul and disrespectful language that would be visible to everyone. This is more appropriate for a publicly accessible meeting. However, it is always relevant.
How: Click on Chat in the Zoom toolbar, click the three dots (...) in the lower right corner of the chat window and select Host Only.
Note: Co-Hosts cannot see the chat messages, only the Host of the meeting can.
Control Participant Video
Zoom meeting controls can restrict participants from turning on their video. If video from participants needs to be managed, here are recommendations:
- Clarify in meeting invitations to participants that they should Mute their video
- Announce in the meeting that everyone should turn their video off
Optional: Set Participant Video to Off when scheduling a meeting - Under Security icon, uncheck Allow participants to: Start Video
- Hosts and Co-Hosts can then right mouse click on any working video thumbnail and click Stop Video (Alternatively, you can go through the Participants list, hover over a participant's name, click More > Stop Video)
For large meetings, this can be a challenge, you can also try the following:
- Once the meeting starts, click Security > Suspend Participant Activities. This will stop EVERYONE's video and microphone and stop current screenshare, and meeting will be locked.
- Unmute microphone and video for yourself and any co-hosts and continue with the meeting
A Zoom webinar license may not be available, but there are ways to set up and control your Zoom meeting similarly to a Zoom webinar.
There are ways to manage your Zoom meeting like a webinar while also providing better security for your meeting.
Managing a Zoom meeting differs from a Zoom webinar in two key areas:
- Participant capacity
- Meeting control
Participant Capacity - Expand with Panopto
With the limit of 300 participants, Zoom meetings can use the custom live streaming option to expand to a larger audience, albeit as a one-way stream.
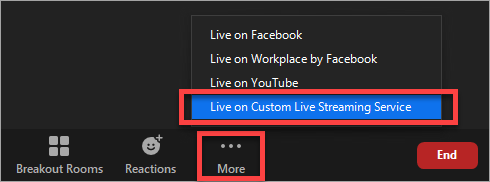
Follow the instructions below to stream via custom live streaming service. Reach out to mediaservices@scu.edu to request a Panopto live stream. You can also live stream to Facebook and YouTube. These services are built-in to Zoom and we cannot provide support for them outside of what the Zoom documents provide.
How: In your Zoom meeting, click More in the Zoom control panel and select your desired option. Only one option can be selected; multiple services cannot be used at the same time. If you select Stream to Custom Live Streaming service, follow the instructions below to start the livestream.
Note: Only one option can be selected; multiple services cannot be used at the same time.
Start the Zoom Meeting and Enable the Live Stream
When you are ready to start the Zoom meeting and enable the livestream
- Open Zoom desktop client and log in if prompted
- Start the desired meeting (this can be a brand new meeting or a pre-scheduled meeting)
- Confirm all audio/video/shared presentation are in working condition within your zoom meeting and you are ready to go live
- Select More > Live on Custom Live Streaming Service >a web page will open
- Fill in the blanks according to the A ~ C label above.
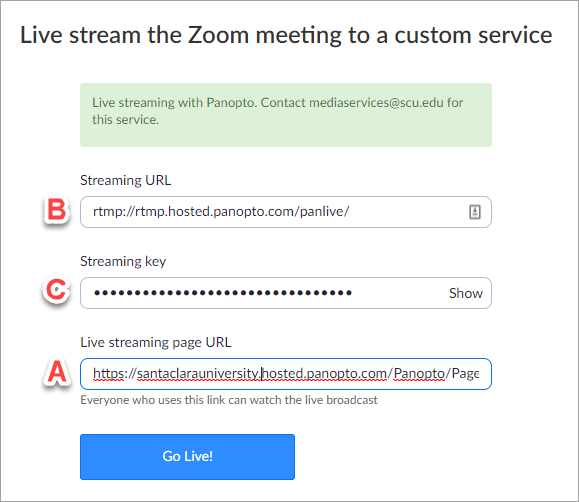
- Click Go Live! button when you are ready. System will take about 30 seconds to prepare and start broadcasting the meeting.

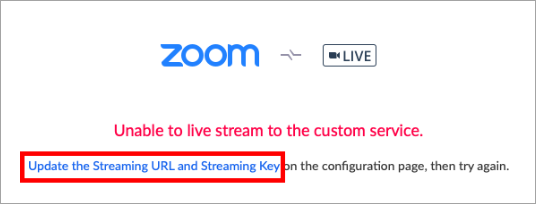
- If the livestream fails to load, this error message will appear. Click to update the streaming URL and streaming key and check the information again.
Notes & Tips
- If you are getting an error when trying to link between Zoom and Panopto, please check the streaming URL and streaming key to make sure they are correct. A common mistake can be an additional space accidentally added to the streaming key.
- Note that there will be minor delays between the Zoom meeting and Panopto webcast (usually just a few seconds of difference.)
- We recommend you do not stop and resume the live stream for the best viewer experience.
- The livestream will follow the host’s view on Zoom.
- After the Zoom meeting has ended, the Panopto system will automatically process the recording and you will be able to share the video with viewers to review on-demand, using the same Viewer Link copied for section A.
- Once you end the Zoom meeting you will automatically end the Panopto streaming as well.